Astrophotography in India - III
Astrophotography in India - III
Essentials
“I am extremely pleased that you have taken up the question
of the bending of light with so much zeal”; the year was 1912 when Einstein
wrote these words to Erwin Freundlich. Erwin was a young German astronomer, who
had decided to embark on an expedition to make astronomical observations to
confirm the theory of space-time being developed by Einstein. The targeted
celestial event was to be the solar eclipse of 1914, which passed over Crimea,
Russia. But fate had other plans for Erwin - World War I broke out and he was arrested by
the Russians. This was a boon in disguise as Einstein’s theory of ‘general relativity’
was still in the works and the theory developed till date contained errors. Einstein
went on resolve the issues and crescendo came about in November 1915, when the
famous physicist unveiled the corrected theory in a series of lectures. In UK,
Arthur Edington became feverishly excited about this theory. After all, it
meant uprooting the Newtonian theory which had served us well for so long. But
due to the war, nothing could be done. Also, one of the predictions of
Einstein’s theory was that the position of stars would alter when observed
without and with the sun in the foreground. This opportunity presented itself
in the form of a solar eclipse in 1919. Luckily, in 1918 the world war got over
and Eddington started out on a journey to capture the stars behind the sun (as
could be done only during solar eclipse). Two different expeditions set out to
two different places where the solar eclipse could be observed. Principe, where
Eddington had gone himself saw extreme rain and only a brief exposure of sun
could be seen in the late afternoon, with a lot of clouds. Eddington himself
was not sure whether he would have the data, but nature granted him his wish.
Out of all the images, he was able to get one clear image of the solar eclipse
with the stars in the background and that one image was enough to prove that
Einstein had been right. The deviation of stars precisely matched with
Einstein’s prediction. Overnight, Einstein turned into a celebrity. Thus, the
first proof of one of the most revolutionary theories of the 20th
century was provided by astrophotography.
In this essay, we wish to discuss the basic instrumentation for one to get started. The journey of a devout astrophotographer can be very long and you are likely to upgrade to more sophisticated instrumentation as your hobby grows. Nonetheless, learnings from early days and simple instrumentation can be invaluable in the course of this journey. So let's get started.
We are trying to capture the image of an object that is very far away from us. It is so far away that we can’t see it with our naked eyes. Actually, the light from these objects travels millions and billions of kilometers to reach us,

Figure 1. Image of the setting sun – 1/1000 sec shutter speed
and even
before it reaches us it is absorbed by various particles in our atmosphere. In
the process, faint objects can become almost invisible to the naked eye.
Deep-sky astrophotography seeks to image many such faint objects, which are almost
invisible to the naked eye.
So,
if we can’t see something how do we image it? When we attempt take a snap, the
shutter of the camera opens for a short duration to allow the light from the
object to enter the camera and fall upon the sensor. The duration for this
opening for a normal photograph clicked in moderate daylight is extremely short
(Figure 1).
Since the objects in question for astrophotography are extremely dim, you increase the duration for which the camera shutter remains open. Welcome to long exposure photography. By allowing the camera shutter to remain open for a long duration, we are essentially allowing a greater number of photons to fall on the sensor which carry the information about the shape, size and colours of the object. The longer you ‘expose’ the sensor, brighter the image.

Objects like nebula the exposures would be much longer)
So, we just increase the duration of exposure and we are good to go? NO. Nothing in life is that simple.
Challenges with Long Exposures.
Maximum
duration. To continuously collect data from the same object, the object
has to remain stationary with respect to the camera for the entire duration.
For low light shots of stationary objects this is hardly a problem. But for the
objects in deep sky we have to be more careful, as Earth’s rotation affects the
relative position of the stars in the night sky Therefore, if your camera is
stationary, then your object would move and you would not be able to achieve
long exposures. Taking long exposure photographs with a stationary camera
therefore produces star trails (This is
utilized in star trail photography).

Figure
3.Long duration photo resulting in star trails
Therefore, there is a maximum duration for which you can expose your camera before trails become evident. The maximum exposure is generally given by the 500 or 600 rule.*
- 500 rule. I have personally found the 500 rule to work better for me. The rule states that the maximum shutter duration is limited by the below mentioned formula:
Shutter Duration =
500/(focal length x crop factor)
If you have a full frame lens then the crop factor is 1. If you have a Nikon camera then it is 1.5 and with the Canon it is 1.6. For example, if you have a 24 mm lens on a Nikon crop sensor body, then your maximum exposure duration has to be limited to 500/(24 x 1.5)= 13.8~13 seconds. This poses a serious limitation on capturing deep sky objects. Since, these objects are too dim we want to increase the exposure duration. To overcome this problem, we use an instrument called the star-tracker.
Star Tracker. Our maximum duration is limited is by of earth’s rotation. Due to this, objects in the night sky appear to be moving. Therefore, if there was a way to impart an opposite rotation to the camera matching the exact rotation rate of earth for that place, objects would appear stationary. This is exactly what a star tracker does (See figure 4). It is a device which is mounted on tripod. The camera is mounted on the star-tracker, rather than directly on the tripod. The tracker now gradually rotates to match the rotation rate of the earth and allows you to take long exposures. A star tracker or a rotating mount is a must if you are serious about astrophotography. The details of different types of star tracker and its setup is dealt with later in this article.
Figure
4. A star-tracker used for all our imaging in this essay series.
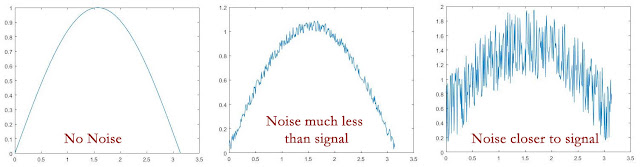
Noise accumulation. In the previous paragraph we have seen that we definitely need long exposures to collect enough signal from the far away object to produce an image. However, as we increase the duration of exposure along with signal, the noise level (unwanted signals from any other source – other stars, street lights, thermal noise of the camera) also increases. This also poses a severe problem. A solution to this problem is stacking, which will be addressed in a later essay.
Light Pollution. The primary reason for having long exposures is because the light off our source is really dim. But the camera sensor will not be able to differentiate between the light from a celestial source and light from other sources (especially the lights of a city if you are trying to capture your image within a city). This is a severe limitation. A general thumb rule is – Darker the place, lesser the noise collected because of light pollution. Light pollution is measured on something known as a Bortle scale. A Bortle scale 1 place is an ideal place with no light pollution and a class 8/9 is a typical metropolitan city. There are applications like light pollution map which give you a fair idea regarding the light pollution of a particular place in terms of bortle scale. You can use it to plan out your session.
In
addition to choosing places with low light there are other measures that can be
adopted that can be very helpful. To block peripheral light, a lens hood is
often employed.
If
the object you are trying to capture is high up in the sky, this works best. Instead,
f the object is on horizon then a hood may not be very usefulthe city lights
will also creep in. Then, you can use different filters (light pollution filter
being one of them). We will discuss about filters in greater detail in a
subsequent essay.
नक्षत्राणां ज्योति: मन: प्रचोदयात्
May the light of the stars illuminate your mind
Notes:
AK dedicates this series of posts to Annapoorna.
About the authors: (First) Shubhanshu Shukla is an amateur astrophotographer.
(Second) Aloke Kumar is currently an Associate Professor at Indian Institute of Science, Bangalore. He tweets at @aalokelab
*'I' in an article refers to the first author of that article
Opinion/views expressed are purely personal and do not reflect the opinion/views of employers.


Comments
Post a Comment